Showing posts with label eclipse. Show all posts

Thursday, July 7, 2011

Eclipse : Creating and Sharing Launch Configurations

This happened again. I downloaded a Java product from sourceforge. It came with a .project, so it is easy enough to import it into the eclipse workspace. Now, comes the humdinger of the problem. How in the world should I launch the application. I can also see a tests package, how can I launch the tests?
Fortunately, eclipse solves this problem through launch configurations. If you are developing on eclipse there is no reason for not sharing the launch configurations along with the code. A launch configuration is a way to inform a fellow developer how to invoke the application. It is like providing a helping hand in during the initial stages - till he/she grows up and find how to launch the application, tests or whatever by themselves.

Temporary launch configurations

If you rightclick on a test case or a main class and used 'Run as...', eclipse creates a launch configuration and invokes the application for you. While developing an application (if you are like me) - you will accumulate a lot of launch configurations. These launch configurations are saved along with the workspace and not shared.

Creating a launch configuration

For creating a launch configuration start with a temporary launch configuration. Open the Run -> Run dialog... option from the eclipse menu, i.e. right click on the file Run As-> Run configuration:
Now select the run or launch script you want (by noting the program name )

  Change the launch configuration name. Use a name that includes atleast the project name and the type of launch it is. No one can understand what 'Main' or 'AllTests' stand for. It is easy to understand 'SampleApp - Main' or 'SampleApp - AllTests'. Here is H2Test, which says we are testing whether program can connect to H2 database.

  You can set the arguments for the VM as well as application from the (surprise!) Arguments tab.

 As far as possible parameterize the arguments. Do not ever use hard coded file names or directory names in a launch configuration that is shared. Eclipse has predefined variables 'file_prompt', 'folder_prompt' and 'string_prompt' for this purpose. When a launch configuration with such parameters is launched, Eclipse prompt the user to either select a file/folder or enter a string.
If your launch is dependent on a particular Java version (suppose you need atleast JDK 1.5 to work) - use the JRE tab to select the JRE. It is advisable to select a particular 'Execution environment' rather than an installed JRE.
The rest of the tabs are self explanatory. If you added any environment variables, remember to parameterize them wherever needed. Launch the configuration using the 'Run' option in the dialog and check everything works fine.

Sharing a launch configuration

If you want to share a launch configuration, you do it through the 'Run dialog'. For opening the run dialog use Run -> Run dialog... option from the eclipse menu. The sharing option is in the 'Common' tab of the run dialog.

 Select the 'Shared file' option. Select the project to which this launch configuration belongs. I suggest the launch configurations to be saved at the root of the project directory. You can also add the launch configuration to the favorites menu (either to Run or Debug). Just click on 'Apply' and the launch configuration is saved. From now onwards, anyone who imports your project can launch the application by just clicking on the launch configuration file and selecting Run as -> <launch name>.

Also if you want you can direct console output to some log file on the file system, under this common tab:
Now you can choose any option like workspace, filesystem or variable. Save the log file location.

Launch configuration best practices

  • Provide launch configurations for all modes of launch. For example, if your application can be launched in UI and command line mode, provide two launch configurations one for each.
  • Do not proliferate the project with temporary launch configurations. I have a separate project where I save all of my temporary launch configurations. This will be checked into the SCM, but not shared along with the project.
  • Provide a launch configuration for running all the tests (if exists).
  • Do not add optional launch configurations into the favorites. My suggestion is to add only the application and all tests into the favorite menu.
  • Parameterize the launch configurations using eclipse variables - folder_prompt, file_prompt and string_prompt.
  • Select an appropriate JRE using the JRE tab and an execution environment.
Finally, launch configurations are for fellow developers and not for end users. Keep it in mind when you create a configuration. Too much of hand-holding might not be needed.

Wednesday, June 29, 2011

Programmatically opening an editor

Eclipse uses file associations for opening appropriate editor on a file. You can see this in action when you click on a Java file or a ant build file. The correct editor is opened for you. If you want to do the same thing in your own plugins - it could not be easier in 3.4.

The class org.eclipse.ui.IDE has a set of static functions that opens an editor and returns a handle to that editor. This function needs a IWorkbenchPage. We can typically get it by PlatformUI.getWorkbench().getActiveWorkbenchWindow().getActivePage(). The second parameter is a handle to the file. It can be a reference to IFile, URI, IMarker, IEditorInput, IFileStore or a URI. The last two cases typically open editors for the files that are outside the file system.

I came across this gem when I need to open an editor on a OS file path. The file is in the workspace, but the path is OS specific. In this case I used ResourcesPlugin.getWorkspace().getRoot().getFileForLocation(Path.fromOSString(file)) to convert the OS path into an IFile. The getFileForLocation() returns null in case the path does not belong to the workspace. That is OK - that is what I exactly wanted.

So here is the entire code:

String filePath = "..." ;
final IFile inputFile = ResourcesPlugin.getWorkspace()
.getRoot().getFileForLocation(Path.fromOSString(filePath));
if (inputFile != null) {
    IWorkbenchPage page = PlatformUI.getWorkbench()
.getActiveWorkbenchWindow().getActivePage();
    IEditorPart openEditor = IDE.openEditor(page, inputFile);
}


If you want to position the cursor to a specific line in the editor - do the following.

int Line = ...
if (openEditor instanceof ITextEditor) {
    ITextEditor textEditor = (ITextEditor) openEditor ;
    IDocument document= textEditor.getDocumentProvider().
                             getDocument(textEditor.getEditorInput());
    textEditor.selectAndReveal(document.getLineOffset(line - 1), 
                                      document.getLineLength(line-1);
}

Saturday, June 25, 2011

FindBugs plugin for Eclipse

Some time ago I wrote a post about FindBugs – a powerful tool for static code analysis in Java. Today I want to tell you about an Eclipse plugin that allows you to integrate FindBugs into your favorite IDE and automatically use it on your code.

The plugin works only with Eclipse 3.3+. The install instructions are quite simple, although depending on your Eclipse version some details like button names may vary. Do not worry though – the installation shouldn’t take you more than 5 minutes (yes, I did check it ). Just go to Help -> Eclipse Market place and search it and then install it, like here:


After you have it installed you can configure its settings for every project you have in your workspace. You can choose what kind of bugs you want FindBugs to look for, how are they reported and when is FindBugs run. The nice thing is that you really do not have to do that as the default settings are pretty reasonable. To get to the settings menu you have to right click on the project and then choose Properties > FindBugs. It looks like this:

After all is configured it is time to run the FindBugs. If you have not set it to run automatically you can start it by right clicking on your project and choosing FindBugs > FindBugs. Below is an example of a code that has been analyzed by FindBugs. Can you see what is wrong with it?
package com.vaani.test;

public class TestClass {

    int number;
    String name;
    
    @Override
    public boolean equals(Object o){
        return ((TestClass)o).name==this.name;
    }
}
So let's just right click on the project and click FindBugs:
OR Go to Project properties and click find bugs and what we get is this:


Notice the little bug markers on the left side of the code – they point to the places where errors have been found. If you move your cursor over them you will get a list of all issues detected – exactly like with regular Eclipse Java warnings. All those errors can also be seen in a ‘Bug Explorer’ window with additional description. To see this window go to Window > Show View > Other > FindBugs > Bug Explorer OR you may also get this window directly. For our code sample the list of errors is as following:


As you can see FindBugs found 7 problems with the code. Have you managed to find them all by yourself? Even if you did you probably see that it is much easier and safer to have FindBugs to detect those for you. And now with this plugin it is also much easier!

Find Bugs with FindBugs

FindBugs is a tool for a static analysis of Java code. It basically goes trough your programs (both .class and .java files) and searches for patterns of most common bugs. When you run it against your code you see a GUI with a listing of all found errors which you can browse trough according to a category or a severity.

The list of bugs that FindBugs can find is almost endless: starting from synchronization issues (eg: bug in access to a shared variable), performance (inefficient operations), ending on dead code and unclosed files. If your project has more than a 1000 lines I bet you’ll find something!

Two things have to be said frankly: not all bugs found will be severe enough that it would be wise to fix them – sometimes the code is too old or crappy to risk the change (well, whose fault is that?). Secondly, not all bugs can be found trough static analysis so an empty FireBugs report does not mean everything is fine. There are many complementary ways to improve the quality of the code (like UnitTests, code reviews) and static analysis is only one of them.

To summarize: FindBugs can find a lot of embarrassing stuff in your code that you probably really want to find. Its not a miracle cure, but for sure you’ll benefit a lot from it. And what is probably most important: it’ really easy in use (download, unpack, run) and IT’S FREE! Just go to Help -> Eclipse market place and search it and install it. Enjoy

Monday, June 13, 2011

Setting up android development in eclipse

For setting up eclipse with android – we need eclipse for sure. Smile with tongue out
So we need -
  • Eclipse EE
  • Install Android Development Toolkit or ADT plugin in eclipse
  • Android SDK

Installing Eclipse

Download eclipse from Eclipse IDE for Java EE developer. If you already have eclipse please ignore this.

Download the Android SDK

Download the Android SDK from here and extract at some location you like.

Install ADT plugin in Eclipse

Next, open Eclipse back up, as we will be adding the Android information to Eclipse. In Eclipse, select "Help -> Install New Software" as shown:
eclipseInstallNewSft In the window that pops up, select "Add", and in the windows that pops up, eclipseInstallNewSft2

Enter "Android" for the name, and for the location, use "https://dl-ssl.google.com/android/eclipse/". Hit "OK". If that location does not work, take the "s" off of "https".

The following window will appear.
android-avaliable-updates

Please select all the packages that appear, and hit "Next -> Next", accept the terms, and then click "Finish".
android-avail-update2

This will begin downloading the Android Development Tools. This will go on in the background of Eclipse. Once it's done downloading, it will prompt you to restart Eclipse. Please do so. (If it tells you you are downloading unsigned content, please say that it's okay.)

Configuration

Next, navigate to Window Preferences and select Android. Get the path of the installed folder. addPath2AndroidSdk


Select Window -> Android SDK and AVD Manager from the menu. AVD_sdk_manager
Select the Available Packages on the left and select the Android versions you want. (I usually pick 1.6, 2.1, 2.2, 2.3, and 3.0). "Accept" the terms and click "Install". This will take quite a bit of time to install all of these, so please be patient. android-add-repositories
Press "Install selected" and confirm the license for all package. After the installation restart Eclipse.
That's all we are almost done.

Create the Android Emulator Device

The Android tools include an emulator. This emulator behaves like a real Android device in most cases and allow you to test your application without having a real device. You can emulate one or several devices with different configurations. Each configuration is defined via an "Android Virtual Device" (AVD).
To define an AVD press the device manager button, press "New" and maintain the following.
1emulator button
Select Virtual Drive tab on left and click New. 2new avd button
Name the device and select on which Android you want to work.
3create avd

Press "Create AVD".
This will create the device and display it under the "Virtual devices". To test if your setup is correct, select your device and press "Start". 4start avd
You will get to see AVD launch options - 5avd_launch_options
After (little long time) your device should be started.
6Andoid emulator started

Monday, June 6, 2011

Eclipse tip: Add a short cut key to Skip All Breakpoints

Eclipse doesn’t have a short cut key bound by default to the ‘Skip all breakpoints’ functionality. So again and again I had to manually skip the breakpoints.
Here is how you can set the short key. While you are at it, you probably want to define a few more shortcuts to functionality you use frequently.
In Eclipse, go to Window > Preferences > Type in ‘Keys’ in the search box > Select ‘Keys‘ to get the screen to edit the command bindings.
Search for the ‘Skip All Breakpoints’ command. Add your preferred shortcut at the Binding field, and in When use debugging.
 I use Ctrl+Alt+B. So when I press Ctrl+Alt+B all break points are skipped. If I again press it all breakpoints are restored.
If you toggle that bit of functionality as often as I do, you know this is gonna save you a bunch of time.

Monday, May 9, 2011

Eclipse productivity shortcuts

Ctrl + Space : Autocomplete the word to some command or variable in eclipse. See here for more.
Ctrl + 1 : If there is just one more shortcut you remember from this post, let it be this one. The other super awesome, context sensitive shortcut in Eclipse, which is basically Quick Fix. See here for more.
Ctrl + F11 : Reruns the last run configuration that was executed. If you do TDD, then Alt + Shift + X, T followed by Ctrl + F11 is the most standard approach.
Ctrl + Shift + R : Shows the Open Resource dialog. Type to filter, and jump directly between classes. I love this shortcut, and use and abuse it!
Ctrl + Shift + O : Organizes Imports, and gets rid of unused imports.
Ctrl + O : Shows the methods and properties of a class. You can start typing to filter and hit enter to jump to a particular signature / type. Hitting Ctrl + O again toggles showing inherited members. Very useful for jumping between sections in a class, or finding that one method you want to get to.
Ctrl + T : Opens the Type Heirarchy. Shows all super classes as well as sub classes / implementing types in your class path. Very useful for jumping to an implementation class. Can be called from the class type, or even a method signature. Can toggle between Supertype and Subtype heirarchy if you hit Ctrl + T again. Again, you can type and filter once you are in this menu.
Ctrl + / : Comment / Uncomment code. Single or multiple lines, depending on what you have selected. Enuff said.
Alt + Shift + R : One of my most used shortcuts, Rename. It renames anything from variables to methods to even classes, renaming the class files if necessary. Also fixes all references to refer to it by the new name. Can sometimes break if there are compile errors, so watch out when you use it. You can also ask it to fix all textual references as well.
Alt + Shift + M : Extract Method. Super useful method to break up a larger method into smaller chunks. If the code block you have selected does not need to return too many types, and looks reasonable as a separate method, then pulls up  a prompt where you can basically edit the method signature, including return type, method name and order and type of parameters. Very useful
Alt + Shift + C : Only useful when the cursor is on a method signature, but this one allows you to refactor and change the method signature. This includes changing the return type, method name, and the parameters to the method, including order, and default values if you are introducing a new one. Automagically fixes all references to said method.
Alt + Shift + L : Once you have a expression selected (a method call, or whatever), then Alt + Shift + L extracts that to a local variable. It prompts you for the name of the variable, and automatically infers the type as best as it can. Extremely useful shortcut!
Alt + Shift + Up / Down : This one is a useful one. If you hit up, it selects the next biggest code block, down selects the next smallest. Useful in conjunction with refactoring shortcuts like extract local variable, extract method, etc. Useful to know.
Alt + Shift + T : Brings up the Refactor menu. Depending on the context, this will show options like Rename, Move, Extract Interfaces and classes, Change Method Signature, etc. Nice to know, but not one I use very often. The ones I do use have already been listed above.
Alt + Shift + S : Shows the Source menu. This includes menu options like Comment related, and the ever useful Override / Implement Methods, Generate Getters and Setters, and much more. Some of the menu options have direct shortcuts, but a lot of the generate commands don’t, so useful to know.
Alt + Shift + X : Pulls up the Run menu, and shows what key you have to press to run a particular type. Now I generally use this as Alt + Shift + X, followed by T, which basically executes a JUnit Test. Fastest way to run unit tests without leaving the comfort of your keyboard.
Alt + Up / Down : Moves a block of lines up or down. Rather than say, selecting, hitting Ctrl + X and then going to the place and pasting, why not just select all the lines, and use Alt + Up or Down to move them. Automatically handles indentation depending on the block. Very convenient
Ctrl + D :  Nice and Simple, deletes the current line the cursor is on. If you have selected multiple lines, then they are all blown away. Much faster than selecting a line and hitting delete.
UPDATE: Adding in some of the shortcuts that I forgot or were mentioned in the comments for easy finding
Ctrl + L : Jump to a Line number
Ctrl + Shift + T : Display available types. A better version of Ctrl + Shift + R if you are only looking for Java classes
Alt + Shift + Up / Down : Duplicate selected lines above or below. Easier than hitting Ctrl + C followed by Ctrl + V
Ctrl + Alt + H : This one, I didn’t know about. but pulls up the Call heirarchy, showing you all callers and users of the method under the cursor. Super useful, especially if you are refactoring.
Ctrl + Shift + L : Show the list of shortcuts. You can hit it again to go in and edit your shortcuts.

Autocomplete text to some function or variable.

Ctrl+Space is one of the two most important keyboard shortcuts that eclipse offers. This one is probably commonly known for autocomplete in eclipse, but not many people know that it is also context sensitive. For example, hitting Ctrl + Space when you are in the middle of typing will show you all members and methods that begin with your text. But hitting Ctrl + Space when you have nothing typed shows you all members and properties available. But the real eclipse masters know that, hitting Ctrl + Space when you type in for or foreach will show you autocomplete options for generating a for loop or for each loop. And if you do it right after you assign something to a collection or a list, it will fill in the loop variables for the for each loop. Autocomplete after typing in test, will allow you to generate the skeleton of a JUnit test case method. Autocomplete after typing in new, generates you a skeleton for a new call, which you can tab through and fill in. So many more uses and use cases for Ctrl + Space that can be found. You can generate / override method signatures in child classes. Just use and abuse it, and you will learn so much.

Eg.
Write sysou and hit Ctrl+Space, following will be generated:
System.out.println();
Similarily various macros are converted to respective words, eg. syserr, ifelse, etc.

Thursday, May 5, 2011

Quick fix shortcut in eclipse

Ctrl + 1 : If there is just one more shortcut you remember from this post, let it be this one. The other super awesome, context sensitive shortcut in Eclipse, which is basically Quick Fix. If you have an error in a line, Ctrl + 1 will show you potential options to fix it, like importing a class, or adding an argument to a method or fixing the method signature. If you just do a method call which returns something, then you can hit Ctrl + 1 and ask it to assign it to a new local or field variable. You can hit Ctrl + 1 on a parameter to a method and assign it to a field. Ctrl + 1 on a variable can allow you to inline it, and on an assignment, can allow you to split up the declaration and assignment, or convert it to a field, parameter, etc.

Autocomplete shortcut in eclipse

Ctrl + Space : One of the two most important keyboard shortcuts that eclipse offers. This one is probably commonly known for autocomplete in eclipse, but not many people know that it is also context sensitive. For example, hitting Ctrl + Space when you are in the middle of typing will show you all members and methods that begin with your text. But hitting Ctrl + Space when you have nothing typed shows you all members and properties available. But the real eclipse masters know that, hitting Ctrl + Space when you type in for or foreach will show you autocomplete options for generating a for loop or for each loop. And if you do it right after you assign something to a collection or a list, it will fill in the loop variables for the for each loop. Autocomplete after typing in test, will allow you to generate the skeleton of a JUnit test case method. Autocomplete after typing in new, generates you a skeleton for a new call, which you can tab through and fill in. So many more uses and use cases for Ctrl + Space that can be found. You can generate / override method signatures in child classes. Just use and abuse it, and you will learn so much.

Tuesday, May 3, 2011

Redirecting eclipse console output to log file

There is a way to redirect the console text into a log/text file under eclipse. If you are running a web-based application, possibility is that you already have a .log file configured some where. You can simply open this log file and look for messages.

In case of pure java application however, most of the output is showin in the eclipse console unless you configure a redirect.

Pull up the "Debug" or "Run" dialogs where you configured your main class. Select the java application you want to run. If you dont have an entry under "java applications", you might have to create one. On the right hand side of the screen, select the "Common" tab. Check the "File" checkbox and mention a physical path+filename in the input textbox. You are all set! Open the specified file in your fav text editor.

Eclipse Shortcut : Open a type like class or Interface

Open a type (e.g.: a class, an interface) without clicking through interminable list of packages: Ctrl + Shift + T. If what you want is a Java type, this shortcut will do the trick. Unlike the previous shortcut, this even works when you don’t have the Java source file in your workspace (e.g.: when you’re opening a type from the JDK).

Thank you

Eclipse : commonly used shortcuts


  1) Ctrl + T for finding class even from jar
  2) Ctrl + R for finding any resource (file) including config xml files
  3) Ctrl + 1 for quick fix
  4) Ctrl + Shift + o for organize imports
  5) Ctrl + /  for commenting , uncommenting lines and blocks
  6) Ctrl + Shift + / for commenting ,uncommenting lines with block comment
  7) Ctrl + o for quick outline going quickly to method
  8) Selecting class and pressing F4 to see its Type hierarchy
  9) Alt + right and Alt + left  for going back and forth while editing.
  10) Ctrl + F4 or Ctrl + w  for closing current file
  11) Ctrl+Shirt+W  for closing all files.
  12) Alt + Shift + W for show in package explorer
  13) Ctrl + Shift + Up and down for navigating from member to member (variables and methods)
  14) Ctrl + l go to line
  15) Ctrl + k and Ctrl + Shift +K for find next/previous
  16) select text and press Ctrl + Shift + F for formatting.
  17) Ctrl + F for find , find/replace
  18) Ctrl + D to delete a line
  19) Ctrl + Q for going to last edited place
  20) Ctrl + T for toggling between super type and subtype
  21) Go to other open editors: Ctrl + E.
  22) Move to one problem (i.e.: error, warning) to the next (or previous) in a file: Ctrl + . for next, and Ctrl + , for previous problem
  23) Hop back and forth through the files you have visited: Alt + ← and Alt + →, respectively.
  24) Go to a type declaration: F3
  25) CTRL+Shift+G, which searches the workspace for references to the selected method or variable
  26) Ctrl+Shift+L to view listing
  27) Alt + Shift + j  to add javadoc at any place in java source file.
  28) CTRL+SHIFT+P to find closing brace. place the cursor at opening brace and use this.
  29) Alt+Shift+X, Q  to run Ant build file using keyboard shortcuts.
  30) Ctrl + Shift +F  for Autoformating.

Shortcuts related to source code insertion Eclipse:

Saturday, April 23, 2011

Adding external library (.jar ) to the Java classpath

The following describes how to add external jars to your project.
The following assumes you have a jar available.

Create a new Java project "ExternalJarTester". Create a new folder called "lib" (or use your existing folder) by right click on your project and selecting New -> Folder.


From the menu select File -> Import -> File system. Select your jar and select the folder lib as target.
Select your project, right mouse click and select properties. Under libraries select "Add JARs".
Eg. adding ant jar.

 Above thing can also be done by Configure build path in :
File->Build->Configure Build Path

Now Click Add External Jars and browse the external jar and add it.

Friday, April 22, 2011

Installing Spring IDE Plugin in Eclipse using update site

Prerequisites

Before starting ensure that you have the following installed:

If you know how to install eclipse plugin, use the Eclipse Software Update wizard to go to the SpringIDE update site to download the latest version (http://springide.org/updatesite).  Otherwise you can follow the tutorial.

Spring IDE

Spring IDE is an eclipse plug-in that helps in developing Spring Application. First we will see how to install the Spring IDE and later we will create our first Spring project using it.
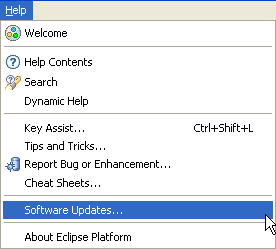
To install Spring IDE, Go to Help -> Software Updates.

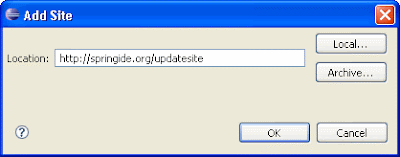
Click the "Add Site" button and enter "http://springide.org/updatesite" in the Add Site popup.

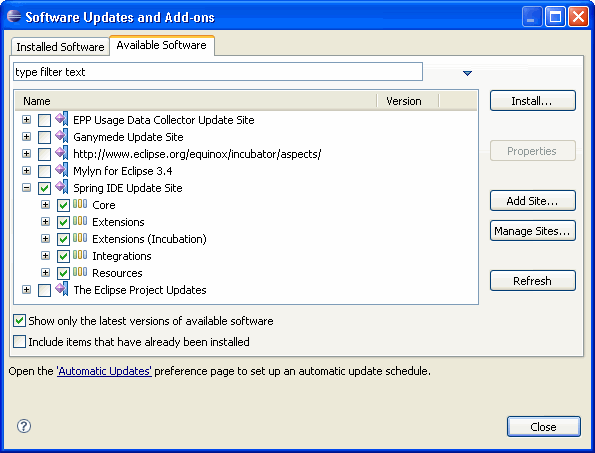
Select all the Spring IDE features and click Install.

Once the installation is complete you are done. Now let's see -  how to create the hello world example using the Spring IDE.

Installing new plugin in eclipse

To install plugins in eclipse we follow following steps:
  1. Click Help->Install new software:


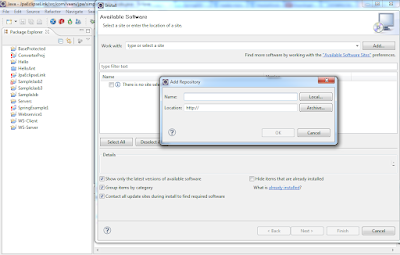
  2. New popup will come up:
  3.  
  4. Now add the name of the update and the update URL.
    Note that name is required just for the sake of knowing what you are updating when you update it again.


    For example, you are installing eclipse plugin, just write name as anything you want to give like springIde, and URL like http://springide.org/updatesite


Thank you.

Thursday, April 21, 2011

Jad Decompiler Plug-in for Eclipse

JAD Eclipse is an eclipse plug-in for the JAD Decompiler. The following is a quick description of how to setup JAD Eclipse (assuming you already have eclipse setup).
  1. Download the latest version of JAD decompiler and set modify your path to add JAD_HOME directory.
  2. Download the latest version of JAD Eclipse from the link shown above and extract it to your eclipse plugins directory.
  3. Restart eclipse and configure JAD as follows
    1. In eclipse, go to - Window->Preferences->Java->JadClipse
    2. Set Path to decompiler to "jad" (jad is already in your path).Click Apply.
This is the basic setup for running JAD Eclipse. You will be able to look in to you library classes by simply clicking on the class file, or the class in the type hierarchy. If you are in the J2EE perspective, you can open up you jar files and look into those class files too. It is up to you to decide how you want to go. By the way, JAD eclipse also has a lot of additional customizations available, which can be seen under JAD Eclipse preferences in Eclipse.

Eclipse SQL Explorer

Eclipse SQL Explorer 3, an Eclipse plugin that allows you to query and browse any JDBC compliant database, has been released. The SQL Explorer adds a new perspective and a few new views to eclipse. The following is a short list:
  • The SQL editor provides syntax highlighting and content assist.
  • Using the Database Structure view, you can explore multiple databases simultaneously. When a node is selected, the corresponding detail is shown in the database detail view.
  • Provides database-specific features for DB2, Oracle, and MySQL)

Friday, April 15, 2011

Eclipse: Workspace in use or cannot be created Error

Earlier I was working in eclipse and it crashed due to some or other reason. Most of the time this is because I have opened a lot of applications that I am working on and this takes a bit of memory. So finally everything just get hanged and does not have enough RAM to work on. Thus, Eclipse just get hanged and what I do is to kill the eclipse process.
But next time when you try opening the workspace it gives you error “Workspace in use or cannot be created, choose a different one.”

So you will loose your last workspace and have to either import project in the newer workspace and this may result in headache. This is because, Eclipse creates a .lock file in the workspace and make the workspace lock. This is to avoid opening the same workspace in different eclipse process.
But when Eclipse is crashed or you kill the process to free the memory, it does not delete the .lock file in workspace folder and thus you cannot open the workspace again with eclipse.

To avoid this problem, simply go to the .metadata folder in your workspace and delete the .lock file.Please do not delete the .lock file if eclipse is already opened

Add your own Code Template in Eclipse

If you are using Eclipse as your primary development IDE, then you may want to know about Code templates in Eclipse. Code templates are certain user defined (some are available by default) templates which can assist in rapid code writing. Not only code templates increase your code writing speed, but it also add consistency across the code.
To add a code template, all you need to do is to write first character and then press CTRL + SPACE. For example, in Eclipse write tr and press ctrl+space. It will add a try-catch block in your editor.

User defined code templates

You can defined your own code templates. Just goto Windows > Preferences > Java > Editor > Templates.
You can click on New.. button to add your own code template.
eclipse-code-templates
Lets create our own code template. For this example, we will create a template which will check if a local variable is null or not, if its null then it will throw a NullPointerException.
Open Template editor from above path and press New.. Then enter following details.
Name: npe
Description: To check if a local variable is null or not.
Pattern:
if (${arg:localVar} == null)
    throw new ${exception:link(NullPointerException,IllegalArgumentException)}("${arg:localVar} is null");

And press Ok to save the template.
Now go to any editor window in Eclipse and press npe and press CTRL + SPACE. You will see a suggestion window which will display you an option to select the npe code template.

Chitika